Shiny 语法
Humoon / 2019-09-09
Lesson 1 Welcome to Shiny
1 创建一个 Shiny App 的过程:
2 官方示例
library(shiny)
runExample("01_hello")      # a histogram
runExample("02_text")       # tables and data frames
runExample("03_reactivity") # a reactive expression
runExample("04_mpg")        # global variables
runExample("05_sliders")    # slider bars
runExample("06_tabsets")    # tabbed panels
runExample("07_widgets")    # help text and submit buttons
runExample("08_html")       # Shiny app built from HTML
runExample("09_upload")     # file upload wizard
runExample("10_download")   # file download wizard
runExample("11_timer")      # an automated timer
Lesson 2 Build a user interface
1 ui的基本布局
ui <- fluidPage( # 流动页面
  titlePanel("title Panel"), # 标题栏
  sidebarLayout( # 边栏布局
    sidebarPanel("sidebar"), # 边栏(一般是输入)
    mainPanel("main panler") # 主体部分(一般是输出)
  )
)
2 ui的内容
在每一个子区域中,用“,”分隔多个内容
| 添加内容的 shiny 函数 | 等价的 HTML5 标签 | 添加的对象 |
|---|---|---|
| p() | <p> |
A paragraph of text |
| h1() | <h1> |
A first level header |
| h2() | <h2> |
A second level header |
| h3() | <h3> |
A third level header |
| h4() | <h4> |
A fourth level header |
| h5() | <h5> |
A fifth level header |
| h6() | <h6> |
A sixth level header |
| a() | <a> |
A hyper link |
| br() | <br> |
A line break (e.g. a blank line) |
| div() | <div> |
A division of text with a uniform style 分隔文本 |
| span() | <span> |
An in-line division of text with a uniform style 行内分隔本文 |
| pre() | <pre> |
Text ‘as is’ in a fixed width font 等宽文本,像代码块 |
| code() | <code> |
A formatted block of code |
| img() | <img> |
An image 必须放在与app.R同级的www文件夹中 |
| strong() | <strong> |
Bold text 加粗 |
| em() | <em> |
Italicized text 斜体 |
| HTML() | |
Directly passes a character string as HTML code 直接在其中书写HTML格式的代码 |
| tags$ | |
当上述函数不够用时,或者为了添加更多层级,可以用shiny::tags$xx()函数构建html元素,共110种,见Customize your UI with HTML和Shiny HTML Tags Glossary |
3 ui的样式
align 参数决定位置
style 参数可以定义字体、字号、颜色
| 中文字体 | 英文名称 |
|---|---|
| 华文细黑 | STHeiti Light [STXihei] |
| 华文黑体 | STHeiti |
| 华文楷体 | STKaiti |
| 华文宋体 | STSong |
| 华文仿宋 | STFangsong |
| 俪黑 Pro | LiHei Pro Medium |
| 俪宋 Pro | LiSong Pro Light |
| 标楷体 | BiauKai |
| 苹果俪中黑 | Apple LiGothic Medium |
| 苹果俪细宋 | Apple LiSung Light |
| 新细明体 | PMingLiU |
| 细明体 | MingLiU |
| 标楷体 | DFKai-SB |
| 黑体 | SimHei |
| 宋体 | SimSun |
| 新宋体 | NSimSun |
| 仿宋 | FangSong |
| 楷体 | KaiTi |
| 仿宋_GB2312 | FangSong_GB2312 |
| 楷体_GB2312 | KaiTi_GB2312 |
| 微软正黑体 | Microsoft JhengHei |
| 微软雅黑体 | Microsoft YaHei |
| 隶书 | LiSu |
| 幼圆 | YouYuan |
| 华文细黑 | STXihei |
| 华文楷体 | STKaiti |
| 华文宋体 | STSong |
| 华文中宋 | STZhongsong |
| 华文仿宋 | STFangsong |
| 方正舒体 | FZShuTi |
| 方正姚体 | FZYaoti |
| 华文彩云 | STCaiyun |
| 华文琥珀 | STHupo |
| 华文隶书 | STLiti |
| 华文行楷 | STXingkai |
| 华文新魏 | STXinwei |
Lesson 3 Add control widgets
每个控件都有唯一的控件名,和用于在web中显示的标签
基本控件表
| function | widget |
|---|---|
| actionButton() | Action Button 按钮,可以点击 |
| checkboxInput() | A single check box 单个复选框 |
| checkboxGroupInput() | A group of check boxes 一组复选框 |
| dateInput() | A calendar to aid date selection 日期输入 |
| dateRangeInput() | A pair of calendars for selecting a date range 日期范围 |
| fileInput() | A file upload control wizard 上传文件 |
| helpText() | Help text that can be added to an input form 说明文本 |
| numericInput() | A field to enter numbers 输入数字 |
| radioButtons() | A set of radio buttons 单选按钮 |
| selectInput() | A box with choices to select from 单选框。常与server部分的Switch函数一起使用。 |
| sliderInput() | A slider bar 滑动条 |
| submitButton() | A submit button 提交按钮 |
| textInput() | A field to enter text 输入文本 |
基本控件图
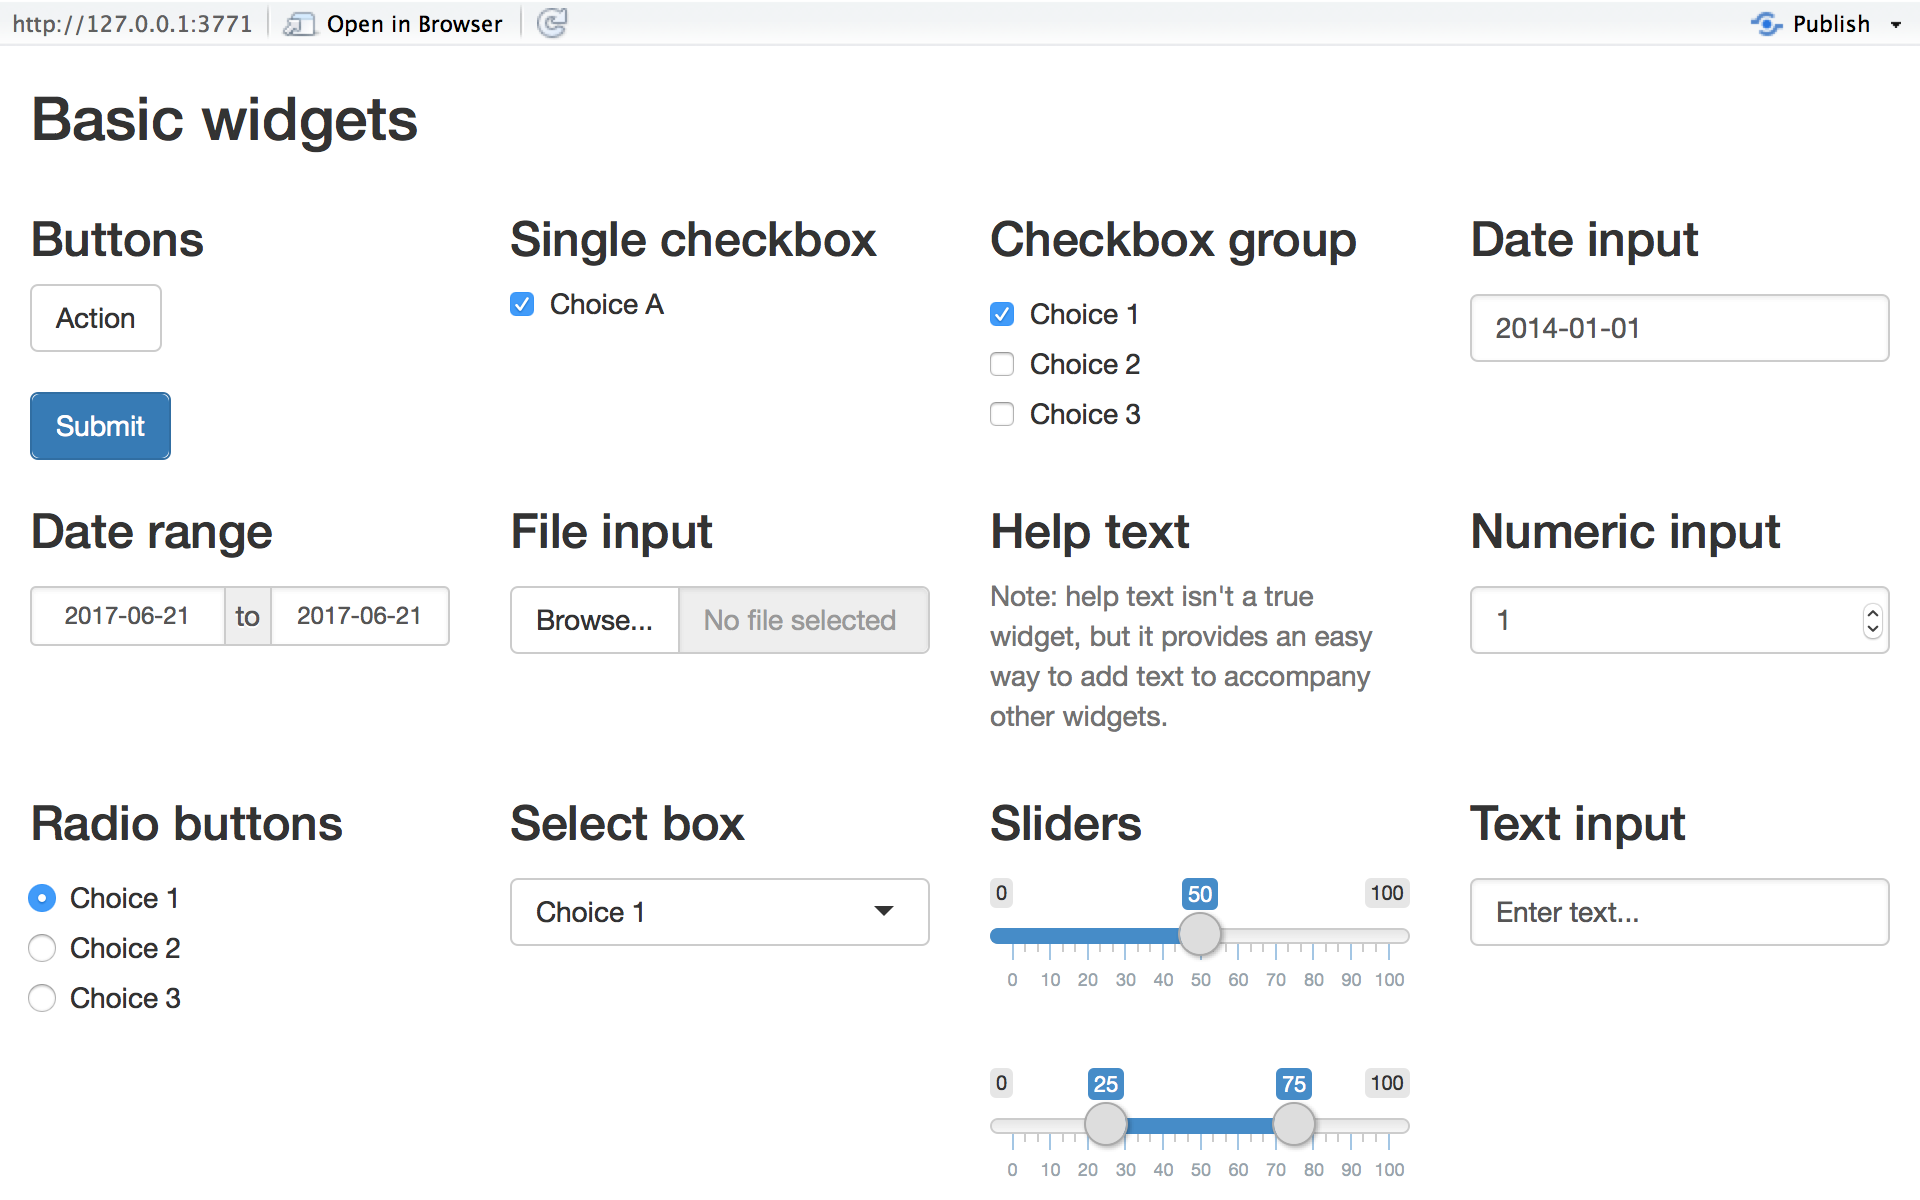
这个图也可以用shiny来画,且为动态的:
library(shiny)

# 基本控件的模板

ui <- fluidPage(
  titlePanel("Basic widgets"),

  # ui为三行布局,这是第一行
  fluidRow(

    column(3, # 这句的意思是这个控件占据三列的宽度,一下皆同。
           h3("Buttons"),
           actionButton("action", "Action"),
           br(),
           br(),
           submitButton("Submit")),

    column(3,
           h3("Single checkbox"),
           checkboxInput("checkbox", "Choice A", value = TRUE)),

    column(3,
           checkboxGroupInput("checkGroup",
                              h3("Checkbox group"),
                              choices = list("Choice 1" = 1,
                                             "Choice 2" = 2,
                                             "Choice 3" = 3),
                              selected = 1)),

    column(3,
           dateInput("date",
                     h3("Date input"),
                     value = "2014-01-01"))
  ),

  # 这是第二行
  fluidRow(

    column(3,
           dateRangeInput("dates", h3("Date range"))),

    column(3,
           fileInput("file", h3("File input"))),

    column(3,
           h3("Help text"),
           helpText("Note: help text isn't a true widget, but it provides an easy way to add text to accompany other widgets.")),

    column(3,
           numericInput("num",
                        h3("Numeric input"),
                        value = 1))
  ),

  # 这是第三行
  fluidRow(

    column(3,
           radioButtons("radio", h3("Radio buttons"),
                        choices = list("Choice 1" = 1, "Choice 2" = 2,
                                       "Choice 3" = 3),selected = 1)),

    column(3,
           selectInput("select", h3("Select box"),
                       choices = list("Choice 1" = 1, "Choice 2" = 2,
                                      "Choice 3" = 3), selected = 1)),

    column(3,
           sliderInput("slider1", h3("Sliders"),
                       min = 0, max = 100, value = 50),
           sliderInput("slider2", "",
                       min = 0, max = 100, value = c(25, 75))
    ),

    column(3,
           textInput("text", h3("Text input"),
                     value = "Enter text..."))
  )

)

# Define server logic ----
server <- function(input, output) {

}

# Run the app ----
shinyApp(ui = ui, server = server)Lesson 4 Display reactive output
上一课通过控件有了输入,本课要在页面中添加输出。
ui中的输出函数
| 输出函数 | 显示对象 |
|---|---|
| dataTableOutput() | DataTable 数据表 |
| htmlOutput() | raw HTML 原始html |
| imageOutput() | image 图片 |
| plotOutput() | plot 作图结果(基于数据) |
| tableOutput() | table 表格 |
| textOutput() | text 文本 |
| uiOutput() | raw HTML 原始html |
| verbatimTextOutput() | text 文本 |
server中的输出函数
| render 函数3 | 返回对象 |
|---|---|
| renderDataTable() | DataTable 数据表 |
| renderImage() | images (saved as a link to a source file) 图片(本地的静态文件) |
| renderPlot() | plots 作图结果 |
| renderPrint() | any printed output 任何可打印的输出 |
| renderTable() | data frame, matrix, other table like structures 表格结构 |
| renderText() | character strings 字符串 |
| renderUI() | a Shiny tag object or HTML Shiny Tag 对象或HTML |
这些函数,使用前最好用 help 查一查,他们有各自的独特设定。比如 renderImage() 默认在发送本地图片给客户端后便会将其删除,必须改一个参数才能反复发送。
Lesson 5 Use R scripts and data
代码执行
在shiny应用中,不同部分的代码的执行次数不同,规律如下:
- 最后的
shinyApp函数在启动app时运行一次 - 每有一个新的用户访问你的shiny应用,就会运行一次server函数,保证每个用户有不同的响应式对象(reactivate object)
- 每次用户进行交互时,render*函数都会运行一次
因此,为了提高shiny app的运行速度,
- 调用包和脚本、读取数据,都应该放在app.R的开始,server函数之外,保证其只运行一次
- 对每一个访问者不同的代码,放在server函数内,render*函数外
- 只有涉及不同输入和输出的代码,才放在render*函数之内